Advent Calendar Sew Along – Ornaments Part 1
It’s time to make the ornaments for our Advent Calendar Sew Along.

If you didn’t catch it before, we’ve already made the base of our advent calendar.
First you need the patterns for your ornament shapes.
You’ll want different colors of felt (mine are all blues and purples) and cut out 2 shapes for each ornament. That will be 48 shapes because we’ll do a star for the top.
The fun part of the ornaments (for me anyway) was getting all the supplies for the sparkle! I don’t usually use very much sparkle in my projects, so this has been a really great way for me to get my sparkle on.

I started with my ribbon and trims. The first trim that I noticed was the metallic silver mini ric rac. If I have the opportunity to use ric-rac, I take it. You’ll need some ribbon for hanging your ornaments. I’m using 3/8 inch silver ribbon
(the link is similar, but not quite the same). I also couldn’t resist the white pom poms. So many fun things to decorate with.

You can’t do bling right without some sequins, right? I bought an assorted pack of sequins so that I could add some different sizes and colors to my ornaments.

For some of the quicker and easier ornaments I found these snowflake buttons for some instant glitz and shine.

I’ve been using lots of special stitches that I don’t usually get to use on my machine, so I wanted some silver thread for those fun details. For my machine I got some sulky silver thread, sulky bobbin thread
and for hand embroidery some metallic embroidery floss
.
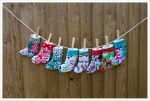
So now are you ready to get going? Here are the first 5 ornaments for my tree.

The top is left open so you have a pocket for your goodies and treats. I have loved doing a mix of hand sewing and different stitches on my machine. Next post will be details on the different decorations I did.
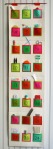
Need some more ideas for shapes? These ornaments from Imagine Our Life are not pockets, but they are so cute! Will be keeping these bookmarked for future ideas.
Advent Calendar Sew Along – Binding
You can find the first section of this series here:
So you’ve finished the quilting on your advent calendar tree base and your ready to apply the binding. I made my binding tape from this fabric.
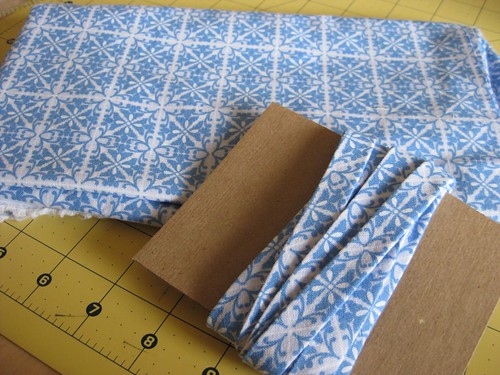
This one fits my blue and purple color scheme and it reminded me of icy snow flakes. If you have never made your own bias tape binding before, now is the time to try! It’s such a great fun way to add a little interest to projects. By far my favorite tutorial for making the binding is Dana Made It: Understanding Bias and making Bias Tape. However, if you’ve never sewn bias binding before, this project is a tricky one to start with. The curves and sharp corners make it harder than most. You have several different options for sewing it on and Dana Made It also has a good explaination of your choices: How to Sew Bias Tape
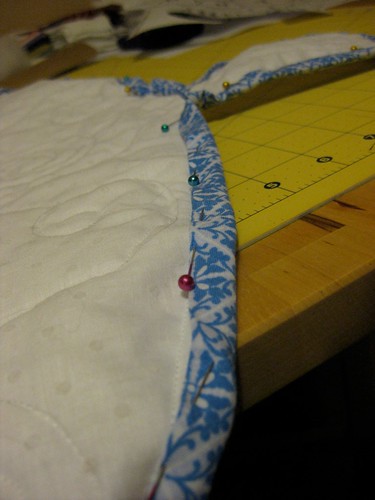
I opted to use lots and lots of pins when sewing my bias tape.
I also decided to hand sew the tape during the final step since it gave me more control. Hand sewing all those curves and corners made it so I could definitely cover up the stitching from the other side. There are a ton of tutorials on mitered corners out there, but the Prudent Baby tutorial is a good place to start.

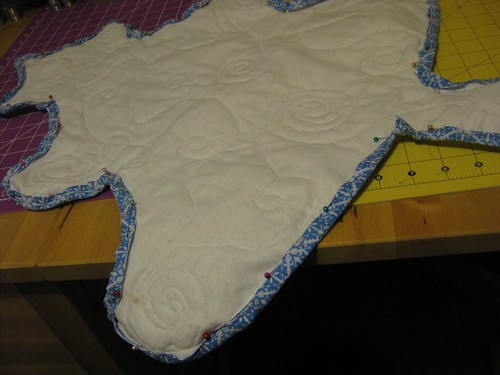
However, it’s a lot harder to find instructions on inverted or inside corners. Some of my corners turned out fairly crisp.
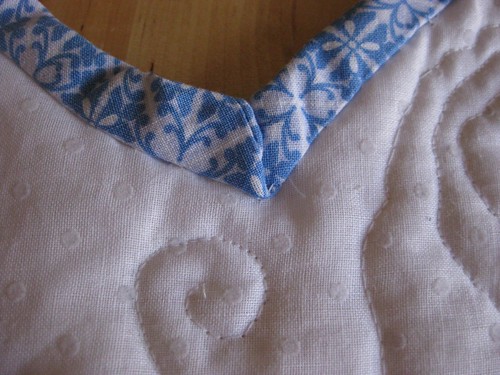
But several didn’t. If I was to do it again, I might try the instructions on this tutorial. Please let me know if you’ve seen another good tutorial for this!
I love the point on the top. :)
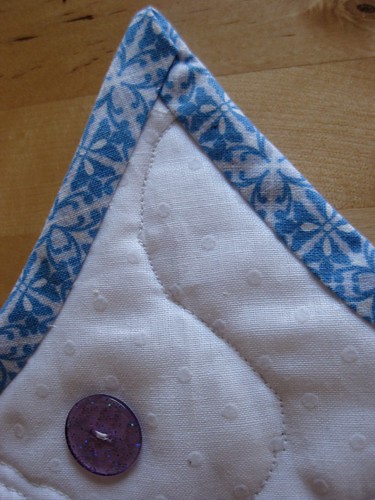
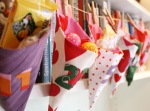
Now it’s time to add buttons. I knew I wanted one on each tree point. I didn’t want one at the top because I’m going to put a snap for a star topper for Christmas Day. I wanted to leave a little room under each button and I didn’t want it to look to organized. My Christmas trees never have ornaments in a row! They are always randomly scattered and I wanted to replicate that.
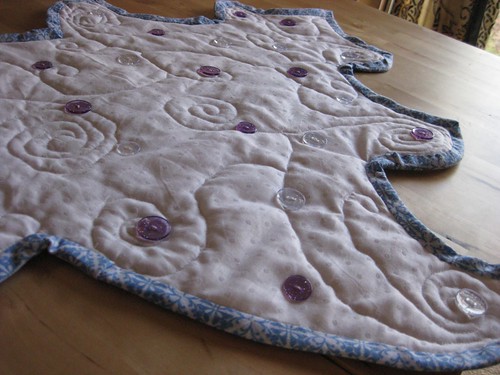
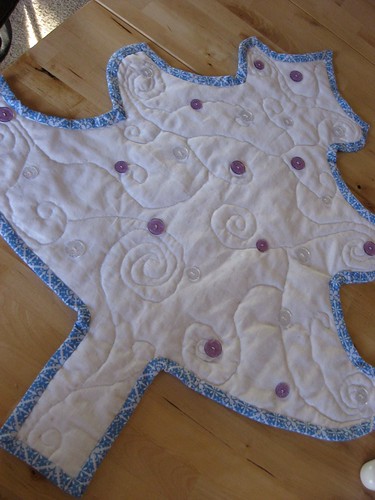
I used purple and clear
(affiliate links) sparkly buttons in both 5/8″ and 3/4″ size. All of my ornaments will be blue and purple felt so I chose these to stay in my color theme.
Next up is sewing ornaments, which I have to admit has been so much fun.
Please share your advent calendar projects in the comments below.
Grab The Button:
<div align="center"><a href=": https://stringsandyarn.com/2013/11/07/advent-calendar-sew-along/" title="Strings and Yarn Advent Calendar Sew Along"><img src="https://stringsandyarn.files.wordpress.com/2013/11/advent-calendar-badge.png" alt="Strings and Yarn Advent Calendar Sew Along" style="border:none;" /></a></div>
Advent Calendar Sew Along
I’ve been working away on projects here and I have so many things to share. A few weeks ago I posted a Handmade Occasions collection on DIY Advent Calendars. At first I though I would use one of those tutorials, but then inspiration struck. I figured there maybe someone out there who would like to sew along with me, so I’m posting a tutorial and the pattern for my Christmas Ornament Advent Calendar.
Grab The Button:
<div align="center"><a href=": https://stringsandyarn.com/2013/11/07/advent-calendar-sew-along/" title="Strings and Yarn Advent Calendar Sew Along"><img src="https://stringsandyarn.files.wordpress.com/2013/11/advent-calendar-badge.png" alt="Strings and Yarn Advent Calendar Sew Along" style="border:none;" /></a></div>
What you will need:
- Advent Calendar Tree Pattern
- 1 yard main fabric 60″ or 1 3/4 yard 44″
- 1 piece of batting 30″x 25″
- 3 yards of double fold bias tape
- 24 buttons
- 1 snap
- various pieces of felt at least 4″x 4″
- 1/8″ wide ribbon
- decorations of your choice (more on that later)
This advent calendar will be a quilted tree with buttons to hang the ornaments by. We’ll make and decorate felt pocket ornaments for each day.
Let’s get started with our tree!
Assemble your pattern after printing it out.

Cut out 2 trees from your fabric and 1 tree from your batting. I am using swiss dot for my fabric since it reminds me of snow. As you can tell from the photo above, I like to trace my pattern and then cut it out. We are going to bind the edges so you don’t have to worry about the ink washing or disappearing.

Then make your quilt sandwich (right side down/batting/right side up) I used safety pins to keep mine together, but I know the quilt spray adhesive is probably the easiest. Pins were what I had.
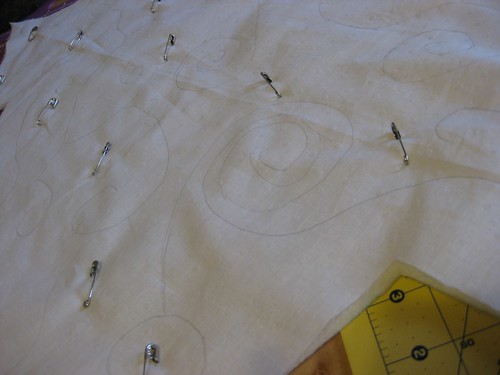
Then decide what quilt pattern you want to do. I did a swirl pattern. A great place to start is to google christmas tree clip art. I thought the swirls would go well with this particular tree shape and complement the curvy points.
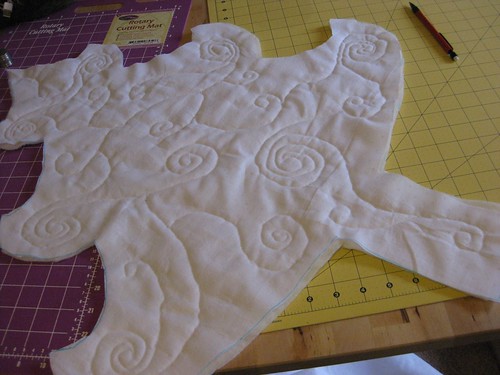
I free motion quilted this tree. It’s actually the first real project I did any free motion on (hence the squiggles).
Next time we will put on the binding and the buttons. Looking forward to seeing your projects!
Fall Felt Leaf Garland
So it may just seem like I’m posting a whole bunch of tutorials for Handmade Occasions, but I actually intend to make a whole bunch of these things! luckily most of them are fairly quick and not large projects to take on. The largest project I’ve started is Connor’s future play kitchen and his felt food.
As I started making the felt food, I realized I barely had any colors. I headed to Joann’s while they had felt on sale and bumped out my color choices. Even though I was primarily thinking about food creation, the fall felt garland had stuck in the back of my mind.

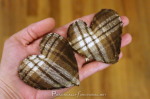
I originally thought that cutting all the leaves would be tedious, but it only took a few hours to get done. Unlike the original tutorial, I decided I wanted some different leaf shapes for my garland. I chose three leaf shapes, used a little clip art to help me sketch them out and started cutting.
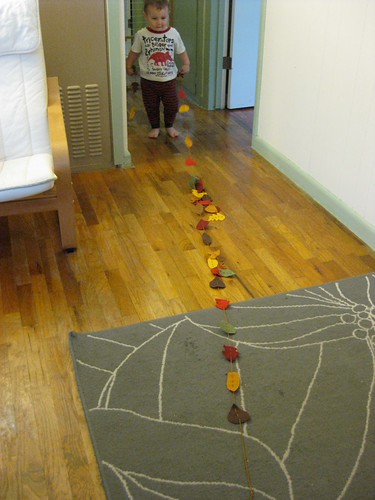
Connor enjoyed playing with the garland a little before I hung it up. So much so that whenever he notices it he asks for it to come back down. I might have to make a little one for him to enjoy.
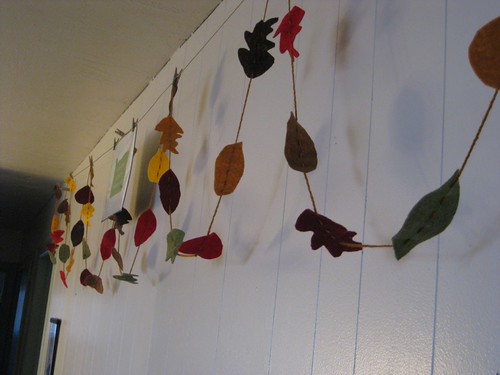
Luckily I had the perfect handspun left over from a cowl that I had made. The orange and brown tones give it that little extra autumnal feel.

I’ve never done much in the way of seasonal decorations, but I’m excited about doing a few things now. It feels more important with Connor. A special way to mark the and learn about the changes outside.
Handmade Occasions – Halloween
I’ve compiled another list of fun things for gifts, decorations and celebrations for your home and family. This week I was inspired and interested in DIY tutorials for Halloween!

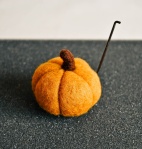 I’ve only explored needle felting in the most basic way, but this looks like a great project to delve a little deeper. This Pumpkin Felting Tutorial from Hand Made By Brynne is full of great step by step photos.
 I have seen several of these cheese cloth ghosts floating (ha!) around Pinterest, but this Floating Cheesecloth Ghost from Love and Laundry got me because it uses cornstarch to make it stiff. Seems like a great project to do with kids and so much fun to customize (arms or no arms?). Not to mention a fun science experiment for older ones.
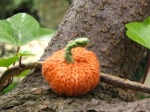 For me, if I’m looking for a quicker wooly pumpkin, a knit one is what I need (I think I have some orange handspun perfect for these little guys). This Knitted Pumpkin Pattern from Natural Suburbia looks quick and easy. Great for a instant gratification project. You can also download her Halloween Knits ebook on Ravelry for free.
 I spotted these awesome Bats by Made last year, and I have been thinking about them ever sense! If any of these decorations get made for this year, this has to be the one. I love how natural they look. If you have older kiddos, it would be a great way to learn some about bats.
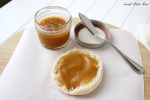 Need something tasty share with neighbors and friends? This Pumpkin Apple Butter from Sweet Bella Roos might be just the thing. Time to get as many pumpkin recipes going as possible! ;)
You can find other Handmade Occasion posts here.
Want to share your own Halloween tutorial celebrating the season? Join our link up below.

Colors of Fall – Saturday Market
It had been awhile since I had been to the Saturday Market, but I’m really glad I at least got to go once this fall. There are only a few weekends left, and even fewer with sunny weather. The colors were stunning, and I couldn’t help myself from taking a few shots. Even if I looked like a tourist in my own town.

These peppers grabbed me first. This year I’ve actually been able to get over my dislike for bell peppers. I’m still not fond of the green ones, but red, yellow, orange. Yum! Not sure about purple though, may need to get a few of those to try.

This pepper booth always gets me. They have a tiny pepper roaster and it always smells like New Mexico to me (home sweet home!) If anyone ever asks me what I miss about NM? Green Chili and New Mexican food! I think most people expect me to say the sunny days. No way! Give me that Oregon rain.

Speaking of Oregon rain. Some of these beauties went home with us. Someday we’ll learn where and how to go chanterelle hunting, but for now we know we can get some at Saturday Market.

I remember moving here and seeing the giant bunches of basil for sale. So fragrant. With those strawberries there, it almost doesn’t look like an autumnal photo though!
The next few weekends we have more autumnal activities planned for our family. Does your family have any fall traditions? How do you celebrate the bounty of wonderful colorful foods?
Handmade Occasions – Week 5
It’s that time of the week again. I’m compiling 5 tutorials for handmade gifts every week and asking you to join in too! Scroll down for the link party. You can seem more Handmade Occasions here.
This week I’m thinking about Advent Calendars. Do you do one? Is it homemade? Connor won’t really understand it quite yet, but it’s a tradition I would really like to start this year. For us, it’s not only a count down to the holidays, but a countdown to his birthday and Anthony’s birthday.

There are lots of options with advent calendars. I’m obviously interested in something made from fabric, because I want to make it once and then use it every year. However, there are tons of creative things out there with paper, toilet paper rolls and even muffin tins. I also am looking for something with little pockets. This is similar to the calendar I grew up with, so it has some sentimental value too.
Look for sewing tutorials and most likely Sew Mama Sew will have something to fit the bill. The quilted advent calendar by Elizabeth from Oh Fransson! is very clever and so beautiful! If you haven’t seen Elizabeth’s work before and you quilt, you must check her out.
 I love the idea of the mini stockings. This one while beautiful will definitely need some time set aside for all that cutting, quilting and assembling. However, even the finishing is great on this mini stocking advent calendar from Needles and Lemons.
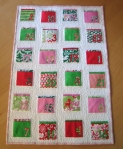
 I know this pocket advent calendar looks a lot like the Sew Mama Sew one above, but instead of quilting, this one uses felt. Purl Bee is fantastic resource for projects that are simple, clean and timeless. The Embroidered Felt Advent Calendar is great for something that will last a long time in a family tradition. I love that the numbers are hand embroidered on each square giving it a very personal feeling.
 This one is similar to the stockings that you would use a clothes line or something similar to hang them, while the cones are separate. The beauty of something like this is that you can add each cone as the days go instead of just filling a pocket. The Christmas Calendar for Sharing by Pickles is a fun creative calendar. I love that not all the fabrics are holiday themed!
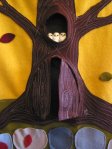 This calendar isn’t for Christmas, but solstice instead! I love the the 3 dimensional nature of the trees and the owls. This calendar can be pulled out for both the winter and the summer and explores learning the seasons. I have to be honest, the Solstice Calendar isn’t really a tutorial (oops!) but this post from Green Kitchen is well worth the inspiration. This paired with one of the tutorials above would work well.
Now having compiled this list, I’m thinking of lots of ideas for ours. Something with pockets? A tree shape? Most likely I will do mine in a blue, purple, ice and winter theme instead of the xmas green and red.
Want to join Handmade Occasions. Compile a list of 5 tutorials (they don’t have to be advent calendars) and link below.

Handmade Occasions – Week 4
Last week was the first week of my fall term, so I decided to take a week off of the Handmade Occasions posts. One of the reasons that I wanted to start doing these was because I still owe a few gifts from previous years. Promises that were made and not quite kept. Most of them I even have the supplies for, but haven’t gotten around to doing.
The person who has probably had to endure this the most is my husband Anthony. In fact, this year, he has requested that I just make him the awesome things I’ve “given” him the past few years. Geeze! What a lame-o I am!
As always, I would love for you to join me in compiling 5 tutorials you think might make awesome gifts. Look for the link at the bottom to join the link party.

Handmade Occasions – Week 4
 So this is one of the Anthony promised gifts… You probably can quite tell from the picture, but these are some awesome DIY cufflinks from Stars and Sunshine. I have plans to make a Doctor Who pair and a pair with parts of his logo. Again, these were already promised so I don’t really have to worry about spoiling any surprises here…
 The other promised gift I’m going to share with you today is a bow tie for Anthony. (Also Doctor Who inspired.) These are ridiculously easy and you can customize however you’d like. This pattern from Angela Osborn seemed very straight forward.
 Last year I made these pocket hand warmers as stocking stuffers. The were easy and quick. This tutorial by Practically Functional shows you the step by step if you’re unsure. Not into making them? There is a little order form at the bottom
.
 Since it is officially the beginning of fall (and it truly feels it here.) I need something to decorate our house with! I love this simple fall leaf garland by A Beautiful Mess.
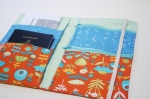 I have always loved Thimble and have admired many of the tutorials posted there. With the holiday season coming up, many of us or our family members will be traveling. Having a travel wallet really makes things easy. I’ve made one for myself (from a different pattern) and it makes it so much quicker to find the essentials.
Hope you enjoyed some of these tutorials. You can check out past Handmade Occasions for more gift ideas or join me by compiling your own list of 5 gift tutorials before Sunday September 29 at midnight PST.

Connor’s Fall Plans
I titled this Connor’s Fall Plans, but in actuality they are my fall plans. This is my effort to expose Connor to new forms of play and get us out of the house doing things (even in the rain).
My husband Anthony and I split care of Connor. I work, Anthony watches; he works, I watch. I get to watch Connor Monday, Tuesday and Friday mornings. This was our first week of trying out our new schedule, and we had a great first week!
Mondays are our free morning. I don’t have anything much planned for this day. It’s our chance to make any errands and do some chores. Most likely I’ll take this day to do some of our more routine artwork such as painting and crayons. On Monday this week we tried out markers for the first time.
Tuesdays are the get out of the house to play day. Most Tuesdays this will be at our closest park. I’ve told myself, we’ll be going whether or not it’s raining. Well, the Oregon rain decided to test my will. We had an unusually heavy rain. We waited awhile, and then we put our rain gear on and headed out.

Thanks to Bonnie for company and the awesome picture of my little guy. Connor loved the rain! (my little Oregonian) He’s been talking non stop about it since we splashed around in the park.
I had seen this invitation for flour play on Tinkerlab and decided to try it with Connor this week. We love including him in the kitchen as often as we can so this seemed like a great extension of that.
I was going to try and get a picture of the invitation of play, but as soon as Connor saw it he dove right in before I could snap one. Good sign!
We started with some scooping.

And some dumping.

This lasted a long time. Connor loved transferring the flour between all of the different containers.
Then Jasmine had to come along and check out what was happening.

She (very audibly) sniffed at the flour. You know you’ve reached the imitation stage when he then very audibly sniffed and snuffed at the flour just like the cat!
We also did a lot of grabbing and touching.

Then we got around to tasting.

His response (even though it doesn’t look that way from the picture) “Mmmm…mmmm….mmmm…mmmmm” Then we found the water and (naturally) needed to take a drink.

We got to squirt the water.

We refilled the bottle several times since squirting was just so much fun. We tried out the whisk.

Got goo in our hair!

And finally wanted to clean up the mess!

Like I said before. These “plans” are much more to get me to try out activities with our little guy. He’s interacting with his environment in new and creative ways every day and observing him learning has been incredible.
This is also in an effort for me to feel more at home with messy play and how to set it up so that I can clean up quick and easy. I taped the corners of a cheap shower curtain from the dollar store to the floor. That plus a few towels nearby made clean up quick and easy.
Have any suggestions for good messy play?
Yogurt Making
I’ve written a little here about my cheese making exploits. (That farmhouse cheddar was okay, but I learned a lot about temperature control and what can cause sour flavors. However, the parmesan I made after that was amazing.) Anthony eventually made me a cheese press and I’ve explored a few hard cheeses and several soft cheeses.
One of the reasons we often try these crazy food experiments, crafting exploits and such are to try to save costs. A while ago we decided to try and make yogurt for just that reason. We go through a lot of yogurt and it always ends up being one of the more expensive things on our grocery receipt. (I must insert here that we have a pretty ridiculously low grocery receipt… Maybe that’ll be a future blog post.) We tried, and tried and it just never quite worked out the way we liked. It was runny with some yogurt flavor. Sometimes it was a little thicker, but not really what we were used to or wanted. So we just kind of decided that yogurt making was probably not our thing and set it aside.
Now that we have our little guy though, we wanted yogurt with more fat in it. Both Connor and I needed more calories, and this seemed like a great way to help that along. However, it is super hard to find yogurt that isn’t low fat or fat free. I love greek yogurt, but now our grocery receipt started climbing again. So after listening to this interview of Sandor Katz on Splendid Table, everything made sense. We have Wild Fermentation (which I immediately pulled off the shelf) and the Art of Fermentation is definitely on the wish list. I knew what I had been doing wrong! Maybe we could be yogurt makers after all.
Let me just say, I would love to find an heirloom yogurt starter. That sounds like so much fun. However, without one, we purchased a small container of Nancy’s Yogurt and so far it’s lasted 5 batches of yogurt and is going strong. Want to make yogurt? Here’s our process.

You Will Need:
- 1/2 gallon of milk (it’s cheaper to get 1 gallon and use the rest for something else)
- Yogurt Starter (see below)
- Thermometer
- Time (approx. 8-10 hours)
Easy right! The hardest part can be the starter. You can purchase a starter like this one or you can try to use a yogurt from the store. The secret is to check the ingredients. It needs to be plain yogurt with nothing added to insure success. If you are using an existing yogurt you’ll need 1 tablespoon per quart of milk.
Take your 1/2 gallon of milk in a pot and place on medium low heat. You want the milk to heat slowly. Stir it occasionally. I often am doing some various chores while making yogurt. Tidy here, stir the yogurt, clean there, stir the yogurt, etc. It takes me about 20-30 mins or so to heat up.
Your target temp is 175°-180°.

I love using this thermometer because I can walk away and it’ll beep at me when it’s ready. I just wish that it worked as the milk is cooling down also!
After the milk has reached temp, turn off the heat and let it cool to 110°. This isn’t surprising if you’ve ever made anything yeasted, or with a living culture. Higher temperatures will kill off yeast, cultures, scoby, mother, etc.

Now I place my starter in my glass pan and spoon in some of the warm milk to mix. People often use mason jars as a container, we just happen to really like this pan for yogurt making in our dehydrator. (Since I’m using yogurt from the store I put in 2 tablespoons for the 1/2 gallon of milk. It’s super important to not put any more than that for a healthy yogurt! That’s one of the things we were doing wrong before: thinking more was better.) Whisk together and then add the rest of the warm milk.

We have a fancy dehydrator that we use for our yogurt making. However, you don’t need this to do it. Plenty of people use a cooler packed with towels, hot water bottles. Something that will help it maintain of temp of 110° – 115°. We put it in the dehydrator and run it for 6-8 hours. When it’s pulled out, it mostly looks like yogurt, but it will also get a little thicker when refrigerated.
Ours has been delicious and a great way for us to save a little money!